Kennel Glitch: 3-Foe Dungeon
As you may have read, each time you enter the Kennel Dungeon, the properties of the dungeon are mixed based on the number
of enemies you've killed. In this list of changes is chest contents. By exploiting the dungeon's free exploration due
to tiles losing their boundary properties, you can access most chests -- at least with this particular number of foes
killed. Study the chart below to see whether each chest can be opened, what it contains, and ultimately, whether it's in
your interest to get to it.
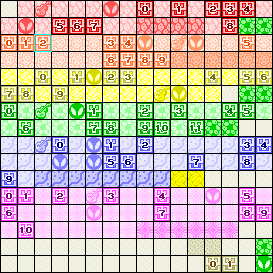
To simplify the chart, I've numbered the chests according to the map below. There's a few features for it that should be noted:
- The screen you start the dungeon in is outlined in cyan.
- Each level gets its own number/color (including caves, with their number being 0 and color being brown)
- The darker rooms on the map imply that those rooms are sidescrolling, usually having some different methods of safe
travel when compared to the normal overhead dungeon screens.
- Instrument and boss rooms are shown by Full Moon Cellos and Nightmares, respectively. While they may seem harmless enough
to the beginner, it should be noted that these rooms only allow escape to the north. Avoid or work around these, but be sure
not to kill any bosses -- this will freeze the game. Also, avoid killing all foes in a room, as sometimes the game
will freeze from that as well.
- The chests are numbered as the screens progress in the dungeon.
If you're planning on speleunking the dungeon, be sure to plot out which chests you want to hit and follow the map so you
don't get lost. If you need the in-game map of the dungeon, click here.

This dungeon layout guide is incomplete. I'll update it as I explore more.
| 1-0: Text | 2-7: ????? | 4-3: Tail Key | 5-7: Text |
| 1-1: Text | 2-8: (inaccessable) | 4-4: Text | 5-8: Tail Key |
| 1-2: Flippers | 2-9: Text | 4-5: ????? | 5-9: (inaccessable) |
| 1-3: (P.Bracelet?) | 3-0: Text | 4-6: Text | 6-0: Tail Key |
| 1-4: Text | 3-1: Text | 4-7: ????? | 6-1: ????? |
| 1-5: Face Key | 3-2: (compass?) | 4-8: Text | 6-2: ????? |
| 1-6: Bird Key | 3-3: Text | 4-9: (inaccessable) | 6-3: ????? |
| 1-7: Gold Leaf | 3-4: Text | 4-10: Shield | 6-4: ????? |
| 1-8: (P.Bracelet?) | 3-5: ????? | 4-11: (inaccessable) | 6-5: ????? |
| 2-0: Text | 3-6: Player Name Change | 5-0: ????? | 6-6: Magic Powder |
| 2-1: Text | 3-7: Tail Key | 5-1: ????? | 6-7: ????? |
| 2-2: (inaccessable) | 3-8: Text | 5-2: Text | 6-8: ????? |
| 2-3: ????? | 3-9: Text | 5-3: (inaccessable) | 6-9: ????? |
| 2-4: Text | 4-0: ????? | 5-4: Full Rupees | 6-10 Text |
| 2-5: Text | 4-1: Text | 5-5: ????? | 0-0: Text |
| 2-6: Text | 4-2: Text | 5-6: Text | 0-1: S. Shells |
Dungeon Tips
- Notable items: Shield(s), Flippers, Magic Powder, Tail Key, Face Key, Bird Key, Gold Leaves, S.Shells, Rupees
- Travel: Limited. Left/right walls are free-for-travel, but touching an upper wall results in text
barring you, and bottom walls warps you to foreign glitched dungeons. Corners are mostly traps, but some may work
for you. Torches are open passages, though upper-wall ones harm you. Sidescrollers are your friends here, many
allowing travel on the walls. Most doors are walkable, but make sure the other side is clear first. Deep water is
walkable, but only the right half of shallow water is -- this can make barriers in places.
- Items needed: None to explore most of the dungeon, but a Bracelet can lift some barriers, flippers can swim
through body-shaped doors, and bomb/arrow/magic rod use may be required to make some chests appear.
Zelda: Link's Awakening Guide Top
