Kennel Glitch: 4-Foe Dungeon
As you may have read, each time you enter the Kennel Dungeon, the properties of the dungeon are mixed based on the number
of enemies you've killed. In this list of changes is chest contents. By exploiting the dungeon's free exploration due
to tiles losing their boundary properties, you can access most chests -- at least with this particular number of foes
killed. Study the chart below to see whether each chest can be opened, what it contains, and ultimately, whether it's in
your interest to get to it.
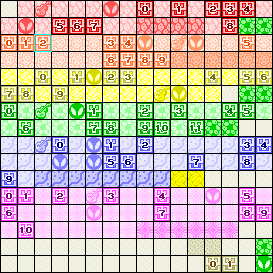
To simplify the chart, I've numbered the chests according to the map below. There's a few features for it that should be noted:
- The screen you start the dungeon in is outlined in cyan.
- Each level gets its own number/color (including caves, with their number being 0 and color being brown)
- The darker rooms on the map imply that those rooms are sidescrolling, usually having some different methods of safe
travel when compared to the normal overhead dungeon screens.
- Instrument and boss rooms are shown by Full Moon Cellos and Nightmares, respectively. While they may seem harmless enough
to the beginner, it should be noted that these rooms only allow escape to the north. Avoid or work around these, but be sure
not to kill any bosses -- this will freeze the game. Also, avoid killing all foes in a room, as sometimes the game
will freeze from that as well.
- The chests are numbered as the screens progress in the dungeon.
If you're planning on speleunking the dungeon, be sure to plot out which chests you want to hit and follow the map so you
don't get lost. If you need the in-game map of the dungeon, click here.

| 1-0: Text | 2-7: Text | 4-3: S.Shells | 5-7: Text |
| 1-1: Text | 2-8: (inaccessable) | 4-4: Text | 5-8: Text |
| 1-2: Photo: Ulrira | 2-9: Text | 4-5: Text | 5-9: Text |
| 1-3: Text | 3-0: Text | 4-6: Text | 6-0: Text |
| 1-4: Text | 3-1: Text | 4-7: Text | 6-1: Text |
| 1-5: Text | 3-2: Text | 4-8: Text | 6-2: Text |
| 1-6: Text | 3-3: Text | 4-9: Text | 6-3: Text |
| 1-7: Text | 3-4: Text | 4-10: Shield | 6-4: Text |
| 1-8: Text | 3-5: Text | 4-11: Text | 6-5: Gel |
| 2-0: Gel | 3-6: Text | 5-0: Text | 6-6: (inaccessable) |
| 2-1: Gel | 3-7: Text | 5-1: Text | 6-7: Text |
| 2-2: (inaccessable) | 3-8: Text | 5-2: Text | 6-8: Text |
| 2-3: Gel | 3-9: Text | 5-3: Text | 6-9: Text |
| 2-4: Gel | 4-0: Bow | 5-4: Power Bracelet | 6-10 Text |
| 2-5: Pegasus Boots | 4-1: Text | 5-5: Roc's Feather | 0-0: Text |
| 2-6: Text | 4-2: Medicine | 5-6: Shovel | 0-1: Text |
Dungeon Tips
- Notable items: Roc's Feather, Power Bracelet(s), Pegasus Boots, Shovel, Bow, Secret Seashells, Medicine, Photo: Ulrira
- Travel: Mid-Easy: While the dungeon is wholly explorable almost everywhere, it may require some tricks here
and there. This is the dungoen to explore for you cartridge users, as many good items can be found and with some tips,
travel is fine. The main barriers of the dungeon are lower and western walls -- they allow no access. However, the
saving grace is every other wall type. A common way to move around is to get to the upper left corner of the screen and
moving whichever way you want. You not only get a look at the next room safely (as all corners are ok), but you can
usually scale the east wall downward from there. Water, pits, crystal switch blocks, and upper floor levels can provide
tough access (especially in L:4), but you can usually work around them. Also of note is that the floor counts as a wall,
but is walkable. This means that projectiles are useless, but also translates into enemies that can't move toward you.
- Items needed: None
Zelda: Link's Awakening Guide Top
